Summer Refreshment

Drink Up!

American Pale AleCitrus with pungent pine washed over my senses, refreshing my taste buds and awakening my sense of aroma. As the hop flavors faded, followed by a bready malt flavor that faded quickly with a dry finish.

Some hop flavor lingered, and as it faded, it seemed to coat my tongue almost candy-like.

My first low-alcohol beer turned out rather well. Friends commented on the fact it is a nice, light color that may not scare off people used to drinking light lagers. Members of my homebrew club, serious beer enthusiasts said they enjoy it as well.

The Vision

My attitude going into developing this recipe was to create a light, refreshing, low-alcohol ale so I could have more than one without being unable to function. No caramel/crystal malts were used, and the bulk of the hops were added at flameout to keep the hop flavor without overwhelming bitterness.

Like stepping into spring water deeper than expected, a surprising burst of refreshment to wake you up and enliven your senses. This pale ale was made to pack a lot of flavor in a light, crisp package. I hope you enjoy.

Flash Flood American Pale Ale

My system is for brewing 10 gallons. If you wish to replicate this recipe on a 5-gallon scale, you should be good to cut quantities approximately in half. My system is approximately 67% efficient. If you use brewing software, you should be able to scale the recipe as needed to match your system.

Grain Bill

4.990 kg Rahr 2-row pale malt

907 g Briess Vienna malt

1.361 kg Munich 20L malt

Hops

Centenniel 8.7% AA 28 g at 60 minutes

Centenniel 8.7% AA 14 g at 0 minutes

Chinook 11.7% AA 21 g at 0 minutes

Cascade 6% AA 21 g at 0 minutes

Yeast

Safale US-05 fermented at 66 degrees F

Target Numbers

Target Volume: 12 gallons

Target OG: 1.034

Target FG: 1.008

Target ABV: 3.3%

Mash Temp: 154 F

Actual Numbers

Volume: 13.5 gallons

OG: 1.032

FG: 1.004

ABV: 3.68%

Mash Temp: 149 F for 50 minutes

Batch Sparge to reach 168 F at target volume

I ran into a few problems with this batch: I am still not used to using a ball-valve and tube to transfer to my mash tun, so I lost more heat than expected. My mash temp came in 5 degrees Fahrenheit lower than my target, but I think that helped develop a clean finish.

The other problem was the humidity prevented my normal amount of boil-off. These two mistakes resulted in a happy medium. The lower mash temp resulted in a more-fermentable wort. The extra volume allowed the gravity to stay under 4% ABV.

The End Result

I love the end result. Shortly after bottling, I wasn’t sure I cared for the flavor. The chinook hops seemed a bit harsh. However, I think it may have been a conflict with the priming sugar not being completely fermented out.

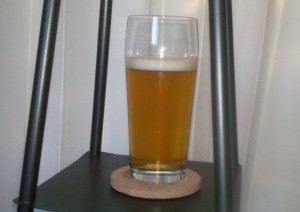
It has been three weeks and the beer is really good and very drinkable. As you can hopefully see from the picture, the head is a brilliant white color and the beer is a pale golden color. It may be slightly darker than a light American lager, but not much. I may have to pick up a container of a light beer for comparison.

This isn’t my first recipe, but it was much-needed to deal with the summer heat. What types of beer do you like to brew for summer? Let me know in the comments.

Back to Back Brew Days

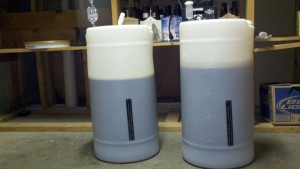
23 gallons of wort!When your beer supply starts to get low, you have to take drastic measures. Over the course of the weekend, I brewed a robust porter and a biere de garde. The result: two fermenters happily bubbling away as 23 gallons of wort becomes beer!

Brewing on back to back days allows certain things to happen and my second brew day ran much more smoothly. My mash tun was already out in the garage, my burner and propane were all set up and ready to go, all the gear I usually have to lug from the basement to the garage skirt was already in my brewing area.

All I had to do was get my grain weighed and crushed, carry my water out and fire up the burner. Having all that stuff set up didn’t really shorten my second brew day much. Rather than carrying stuff up to my brewing area, I had to clean and store my gear. The end result being not much time savings on day two. However, the combined time for the two brew days was much lower than the time for two brew days separated by weeks, when I would have to duplicate the setup time and the cleanup time for two distinct brew days.

So, what are the benefits of back to back brew days besides some minor time savings? I think the main benefit is knowledge. When brewing on a day all by itself, I worry about remembering everything to try to make the day as efficient as possible. The second day, I was really able to think about my process.

I just added a weldless ball valve to my kettle, which is awesome. I am so lucky I hadn’t burned myself. However, my water temp going into the mash tun was much lower because it took a few minutes to run the liquid through a half-inch  tube rather than just dumping the kettle into the tun.

My second brew day I realized I could just raise the temp of my strike water, transfer to the mash tun and wait for the water temp to drop to my targeted temp. It’s something obvious, but when I’m in the heat of set up and trying to stay focused, I don’t always think of obvious solutions.

When you can, I think scheduling back-to-back brew days would be great to learn more about your brewing process. In the comments, let me know what you’ve learned from doing brews close together.

Biere de Garde

Mashing biere de garde, while enjoying some Lazy Monk dark lagerAs the second brew day in a row, this batch actually started last summer. One of my friends from my homebrew club started Lazy Monk Brewing. He gave me a recipe for a biere de garde as a possibility for one of his seasonal beers.

This last year was pretty crazy, so I hadn’t gotten around to brewing this recipe. We moved twice and it took a while to get settled into our new house. So, I figured I’d see how this recipe turned out.

Since the recipe was created by Leos, I figured the only appropriate beer to drink while brewing this recipe was his Bohemian Dark Lager. It started the brew day off on an awesome note and provided a relaxing background flavor to complement the fun of brewing a new recipe.

I’ve never had biere de garde, so I’m not sure what to expect in the finished product. It’s a lager fermented a little bit warm to contribute to the flavor. This batch, fermentation started at 59 degrees Fahrenheit and heat from fermentation rose the temperature to 61 degrees over the course of fermentation. I’m really looking forward to seeing how this turns out! The hydrometer sample tasted awesome, as did the sample at bottling time.

When you try a new recipe, do you first brew a smaller than normal batch to see if you like it or do you just go for it? So far, I just brew a full-sized batch and hope I like it. Let me know what works for you.

Biere de Garde

Grain bill

  • 9 kg Pilsner malt
  • 4.536 kg Munich II malt
  • 454 g Caravienne
  • 61 g black patent malt

Hops

  • 80 g UK Fuggles 5.0 % AA at 60 minutes

Adjunct

  • 2 pounds dark brown sugar added at 15 minutes for sanitization

Yeast

  • 2 packets Saflager S-23

Mash

  • Target mash temp: 147 degrees Fahrenheit (my mash came in hot at 153 degrees F)

Boil Volume: 14 gallons

Target Original Gravity: 1.074 (actual: 1.068)

Target Final Gravity: 1.019 (actual: 1.010)

Target Batch size: 12 gallons (actual: 11.5 gallons)

Boiled for 90 minutes, being really careful as the boil started. It was nerve-wracking with the wort so close to the top of the kettle.