What’s that Flavor?! Bottle-Conditioned vs Force-Carbonated Part 4

I started this article series earlier. Read: Part 1, Part 2 and Part 3

Bottling Day

Here’s where our paths diverge to see if there is a difference in kegging vs bottling. Unfortunately, I forgot to take some pictures of the process.

Andy and I met at his house on a Thursday evening after work. I was dreading the task of bottling because it always seems to take all available time plus, at least an hour. Someday, I’ll post a story about the relational dangers of homebrewing and thinking, “This will only take about an hour.” All I can say is, “Don’t. Just don’t go down that road of thinking.”

Anyway, I got to Andy’s about 6:15 and as I started unloading my bench capper, bottles, bottling bucket, sanitizer, etc(bottling big batches of beer takes a lot of equipment), Andy was running water for a batch of sanitizer. He had his keg prepped and we got everything in place. I carried the beer from his basement upstairs to his kitchen. After placing the fermenter on his serving freezer, we realized the critical error I just made: I placed 110 pounds on top of all the beer available to drink. Oh well, it ain’t moving till we’re done.

We sanitized Andy’s keg and started racking the beer into it. We were a little too frantic on brew day to truly appreciate the benefits of using half-inch siphoning equipment. It goes a lot faster than standard 5/16-inch. I swear, it took about 2 minutes to fill Andy’s keg.

Once we got the keg taken care of, we sanitized our bottles and boiled a batch of priming liquid. We wound up with about six gallons of beer, so we used a little extra DME for priming.

With two of us working, Andy filled the bottles and I capped. I’m not sure exactly how long the bottling took, but it didn’t take nearly as long as I expected. This probably took about a half hour.

Cleanup probably took about twenty minutes. We just rinsed stuff out and I finished my normal cleaning regiment when I got home. I probably spent another 20 minutes making sure all my equipment was cleaned and sanitized before putting it away.

I was expecting the process to take at least 3 hours, since that seems to be about how much time I spend bottling five gallons. 10 gallons usually takes me about 4 hours for cleaning & sanitizing, bottling and clean-up. As I said earlier, I got to Andy’s about 6:15 PM. at 7:45, I was calling my wife to let her know I was on my way home. I even got to tuck my kids in to bed.

If you have friends who like to help drink your homebrew, I highly recommend convincing one of them to help you bottle. It’s not a lot of fun, but it’s much more enjoyable and more efficient with a helper.

Now, we’re just waiting for the bottles and the keg to carbonate. I’ll post an update with our tasting notes when that happens. It might be a few weeks.

 

Memorial Weekend Porter

Looking at the forecast for Saturday, May 26, 2012, I thought it looked like a good day to brew. Thunderstorms, windy and cloudy weather seems like the perfect time to play with fire & propane, right? Right. That’s what I thought.

The brew day was somewhat spur-of-the-moment. I’ve been drooling about recreating my imperial California Common, and also making another Kolsch. But I didn’t have those yeasts on hand, so I decided on a porter. Dark beers are a favorite of my father-in-law, and I love ’em too. Since it was Memorial Day weekend and he’s a Veteran, I brewed the porter in honor of his service.

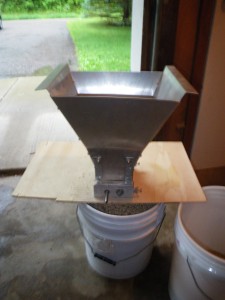
Grain & Crusher
Crushed Grain for 12 gallon batch

Grain Bill:

  •  9.0 kg Pale Malt
  • 680 grams Chocolate Malt
  • 450 grams Crystal 80
  • 450 grams Black Patent malt
  • 324 grams Crystal 40
  • 51 grams Roast Barley

Hops:

  • US Goldings, 4.5% 78 grams @ 60 minutes
  • US Goldings, 4.5% AA 78 grams @ 10 minutes

Target OG: 1.053

Yeast: Safale S-04

Fermentation temperature approximately 68 degrees Fahrenheit.

I was focused on using ingredients I had on hand, so I couldn’t make any of the recipes I found online or in my brewing books. I took a little inspiration from several recipes and combined them into this monstrosity. They hydrometer sample tasted pretty good, so I have high hopes.

I mashed in with 10 gallons to hold a temperature of 150 degrees Fahrenheit for about an hour. While the grains were mashing, I headed inside and got my fermenter cleaned and sanitized and got my auto-siphone, tubing and airlock soaking in the sanitizer solution.

The first runnings had the color and appearance of thin, used motor oil, but clean. They looked thick and nearly opaque, but appeared brilliantly clear.

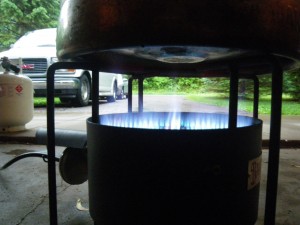
Banjo burner boil kettle
You need a big burner to boil over 10 gallons of wort

As soon as the first runnings were drained, I fired up the burner to get the boil going. I stirred up the batch sparge and let it sit for 15 minutes and added it to the kettle.

The second runnings had the appearance of strong coffee. Jet black, but light could pass through. I wound up with just over 13 gallons going into the brew kettle.

As my wort was coming up to boil, clouds rolled up the Chippewa River valley where we live. By the time I reached a boil rain was falling and lightning was flaring close enough to affect the lighting in my garage.

It was dark enough for the rest of the brew I needed to use a flashlight to see into the kettle to tell if the boil was still good. My propane tank nearly ran out, but at least it was warm enough to keep it from freezing up.

If every brew day this year ends with a rainstorm, it’s going to be a long year. My wife said we may have to invest in a pop-up shelter so I can stay dry without brewing in the garage.

When I put in the 10 minute hops, I added my wort chiller to sanitize it and waited for the boil to complete. It took about 15 minutes to drop the temperature from boiling to 68 degrees Fahrenheit. There was much stirring involved to help circulate the wort close to the chiller.

I had boiled water earlier, cooled it and used it to rehydrate two packets of Safale S-04 yeast. I pitched the yeast into my fermenter and racked the beer on top of it. All I can say is, “I love my half-inch Auto-Siphon. I almost wish I would have broken my old one sooner.” I just got the half-incher before the Big Brew because I broke my original when I was trying to separate the tubing from the cane portion. Siphoning goes so much faster with the half-inch than with the 5/16. Upgrade now. You won’t regret it.

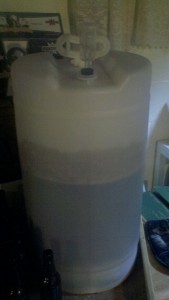
10 gallons of porter
Just over ten gallons of porter bubbling away

I had everything cleaned up by 7PM. By the time I woke up Sunday morning, the yeast was already getting busy. There was a steady stream of bubbles, and by lunchtime there was sanitizer foam coming through the top of the airlock it was bubbling so furiously.

Now comes the waiting. My least favorite part. I hope to bottle sometime mid-June, so I should have a fully carbonated report by July.

Brew Big or Go Home!


Accidental Imperial – A Disaster?

I submitted this story to Basic Brewing Video’s 2011 Disaster Stories episode. I am posting the text here as the first post of my blog.

My disaster story may not qualify as a true disaster, since the end result wound up being one of my favorites so far. As logic would dictate, the opportunity for disaster increases greatly every time you change something, so it should come as no surprise my disaster came on my first all-grain brew day.

My father-in-law’s favorite beer is Anchor Steam, so I decided to make a batch of Jamil’s “Uncommonly Lucky” from Brewing Classic Styles.

Being obsessed with learning new information, I had done lot of reading before embarking on this journey and felt pretty prepared. Let’s see how it went.

When I had built my cooler mash tun the weekend before, I purchased regular PVC pipe for the manifold, not the type for high pressure/temperature. I noticed a potential problem as I was pouring my strike water into the cooler: my nice, flat manifold now approximated the shape of elbow macaroni. I got all the pieces back together and stirred in my grain and mashed it for an hour. Due to the deformity and reassembly, I have no idea what the mash temp was when I finally got the grain in the cooler.

So, after about 50 minutes I started heating my mash out water. It wound up taking bout 20 minutes, so the mash went longer than it should have. Figuring it’s better to keep going, I just kept the mash out water the same temp called for and dumped it in to the cooler, let it sit for 10 minutes to settle(after stirring) and started to run of into my kettle.

Hmmm, I know you’re supposed to run off the water slowly to help rinse all
the sugar from the grain, but my friend’s sparge seemed to run faster than
THIS. After taking 20 minutes to run off approximately 1 gallon, I figured
something was wrong.

I started scooping my mash into a bucket and quickly discovered my
manifold hand fallen apart and come completely disconnected from the
coupler leading to the ball valve. I got everything back together and held
it in place while I added my mash back in to the cooler, vorloffed and
started to fill my kettle.

I got my wort boiling and added my hops according to the recipe. The rest
of the brew went smoothly, I chilled the wort and racked it into my
carboy.

The observant among you may have noticed something missing from my tale .
. . the BATCH SPARGE. Jamil’s recipes plan for you to have 5.5 gallons of
liquid racked to your fermenter. I had 3.5 gallons. I wound up bottling
about 3 gallons of 6.7% ABV “Imperial” Common Beer.

Now I have to figure out how to replicate all the problems that happened
into a larger batch. My father-in-law and I agreed it has been one of my
best batches yet.

So, it may not be a disaster since the end result was happy beer-drinkers,
but I figured you would enjoy the story.