 “Dude, I hate to tell you, but you must have dropped off your burner at my neighbor’s house. I have no idea where it is.” A grin split my face as I typed the last sentence in to Google Chat. I had just finished brewing a five-gallon batch of stout using my friend’s Blichmann Floor Standing Burner. As I closed the chat window, I knew I was going to have to load up the burner and bring it back to Andy’s house.
After brewing one batch, I wished I had waited to buy this burner and leg extensions rather than rushing into buying the burner I’ve used for two years.
Settling for What Seemed Good
 When I decided to start brewing all-grain, I knew I was going to need a big burner. After much research, I was seduced by the Bayou Classic KAB4; its high BTU output along with mid-range price convinced me it was the perfect fit.
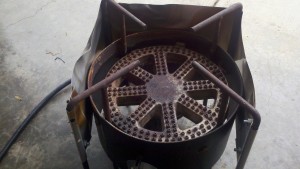
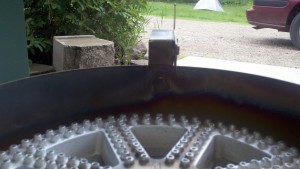
I planned to upgrade to ten gallon batches quickly, so I knew I was going to need lots of BTUs to achieve and maintain a good boil. I learned the primary design flaw of this burner: there is too much distance between the burner and the kettle support.
The distance between burner and kettle support caused two different problems. The most obvious is simply the amount of heat lost due to the kettle being four inches above the burner output. In order to try to make up for the lost heat, I run the burner at as high a flow rate as possible. This causes the fuel to be consumed so fast I have frozen my lp tank to the ground, while creating enough ice on the tank to stop the lp flow. Even after adding the aluminum shielding seen in the picture above, it takes a long time to bring even five gallons to a boil.
Side-by-Side Batches
The day I used my friend’s Blichmann, another friend was using my burner to brew a five-gallon extract batch. My burner took ten and a half minutes to transition from a simmer to a full boil. The Blichmann powered through that transition in the matter of two minutes. If you’ve brewed enough, you know the signs as your wort nears the boil: thick, fine foam on the surface; hissing from the bottom of the kettle; and a rise in the level of liquid in your pot.
The LP tank attached to my burner had a solid layer of frost glittering at me by the time we transferred my friend’s summer ale into his fermenter. Even though I was boiling a larger volume of liquid, the Blichmann did not need to have as high a flow-rate to maintain the boil. As a result, the tank did not ice over and the boil was more consistent.
Why It’s Awesome
The Blichmann burner has a much more stable kettle surface than the burner I purchased. Boiling in a converted keg allows me to brew a wide range of batch sized. Unfortunately, the supports on my burner are the same width as the collar on the bottom of the keg. As a result, I have to make sure my kettle is placed precisely so it doesn’t tip off the side of one of the supports, while the Blichmann has adjustable supports on each leg of the burner. This allows you to support kettles up to 21 inches in diameter.
 Having the burner close to the kettle support allows the heat created to go directly to the bottom of the kettle, rather than escape into the atmosphere. The well-designed shroud protects the flame from wind gusts and provides approximately 72,000 BTU/hr.
Finally, the burner leg extensions are a must-have. Whether you siphon from your brew kettle or use a ball valve transfer the liquid from your kettle, these leg extensions bring your kettle up to a comfortable working height. With the ball valve on my kettle, I would be able to drain directly into my 15-gallon plastic fermenter without the need to move my kettle.
Currently, I have to live about 13 gallons cooled wort along with the weight of the kettle and the chiller to a higher platform before draining into my fermenter.
Do yourself a favor and buy this burner and the leg extensions for your home brew setup. This will be one of my upcoming purchases.
